
Have you ever gazed at those exquisite crystal necklaces, bracelets, and earrings and thought, “I wish I could make something as stunning as that?” Well, the good news is you absolutely can! Crafting your own crystal jewelry is not only a creative outlet but also a meaningful way to wear something uniquely you.
Grab your creative spirit and dive into the glittering world of DIY crystal jewelry-making. Here’s everything you need to know to get started making crystal jewelry.
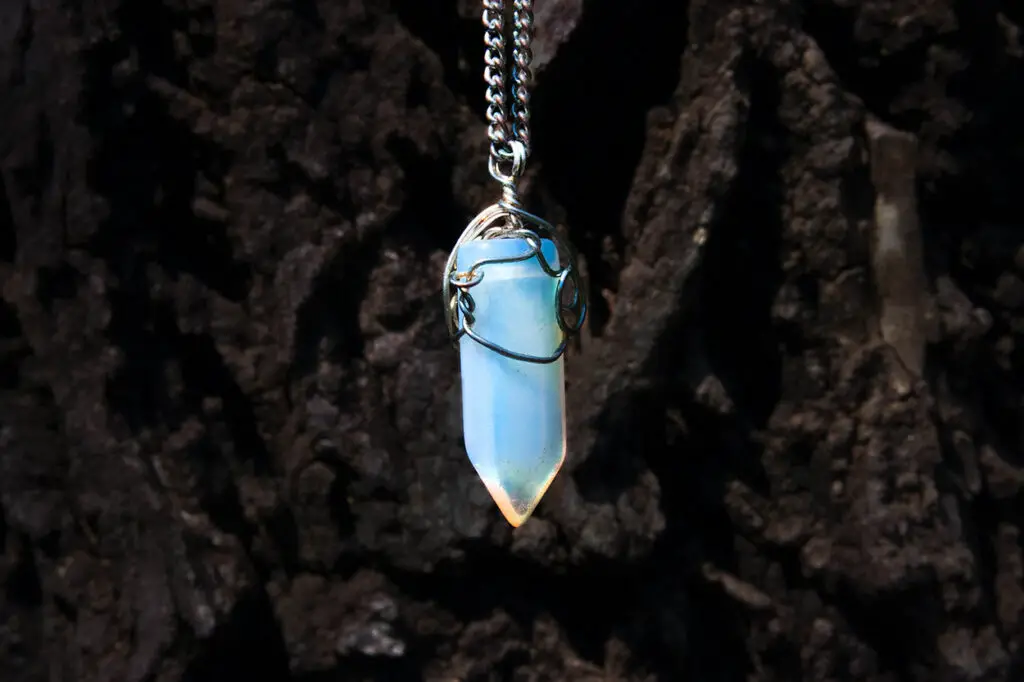
How to Make Crystal Jewelry With Wire
In most situations, you’ll find crystal jewelry is wire wrapped in some fashion. This could be incredibly simple wrapping that puts just the crystal on display or the wire could become a form of artwork in itself.
Step 1: Gather the Crystals of Your Choice
To start with, the first step in creating your own crystal jewelry is, of course, selecting the crystals you want to work with. Whether you’re drawn to the vibrant energy of amethyst or the soothing vibes of rose quartz, there’s a crystal for everyone.
Visit your local metaphysical shop or craft store to pick out a crystal (or crystals) in person. You can also explore online marketplaces to find a dazzling array of options that may not be available to you at brick-and-mortar stores.
Step 2: Tools of the Trade
Now that you have your crystals, let’s gather the tools you’ll need for your jewelry-making adventure:
- Crystals: Your chosen gemstones are the stars of the show.
- Jewelry Supplies: These include clasps, jump rings, ear wires, and chains.
- Wire: Craft wire, preferably in sterling silver or gold, for wrapping and creating intricate designs.
- Pliers: Round-nose pliers, chain-nose pliers, and wire cutters are essential for manipulating and cutting wire.
- Beads and Charms: These add a personal touch and complement your crystals beautifully.
Step 3: Design Your Masterpiece
Now comes the fun part—designing your jewelry piece! Here’s how you can go about it:
Sketch It Out
Start by sketching a rough design. How do you want the crystals to be arranged? Will it be a necklace, bracelet, or pair of earrings?
Lay It Out
If you’re incorporating beads and charms, lay out the design before you start stringing. This will help you visualize the final piece and make any necessary adjustments.
Step 4: Bring Your Vision to Life
With your design in mind, let’s put those hands to work:
Gently wrap the wire around your crystal, securing it with loops. Don’t be afraid to let your creativity flow—experiment with different wrapping techniques to achieve a unique look.
String your beads and charms onto your chosen string or wire, following your design. Make sure everything is spaced evenly and secure the ends with clasps.
Step 5: A Touch of TLC
Congratulations, you’ve crafted your very own crystal jewelry piece! But before you show it off to the world, a little tender loving care is in order.
Gently polish your crystals with a soft cloth to ensure they’re gleaming at their best. Then double-check that all your clasps are secure and that your wire wrapping is holding everything snugly.
Step 6: Flaunt Your Creation
Now that your masterpiece is ready, it’s time to rock it with pride! Wear your jewelry as a personal talisman, a conversation starter, or a dazzling accessory—it’s all up to you.
Remember, the beauty of crafting your own crystal jewelry lies not only in the finished piece but also in the creative journey. Each piece you make will hold a little piece of your energy and style, making it truly one-of-a-kind.
So, there you have it, dear readers—a crash course in creating your own crystal jewelry. From selecting the perfect crystals to designing and crafting, this journey is all about expressing yourself and embracing your inner artist. Have fun, experiment, and enjoy the process of turning raw materials into wearable works of art.
How to Make Crystal Jewelry Without Wire
But wait. What if you don’t want to use wire? Don’t worry. We didn’t forget about wire-free crystal jewelry creation.
If you’re looking to craft a crystal necklace without the use of wire, fear not! The knotting technique comes to your rescue, allowing you to showcase your precious gemstones while adding an artistic touch to your jewelry.
Materials You’ll Need
You’ll need all the same materials mentioned in the previous section. However, for wire-free jewelry, you’ll swap the wire for silk cord or nylon thread. These flexible materials will provide the base for your necklace and allow for knotting.
Section 1: Preparing Your Materials
Before you begin knotting, it’s essential to prepare your materials:
Measure the cord to determine the desired length of your necklace and cut the silk cord or nylon thread accordingly, adding a few extra inches for adjustments.
From there it’s time to thread the clasp. If your chosen clasp isn’t already attached to the cord, thread it through and tie a secure knot to hold it in place. This is super important, so don’t skip this step!
Section 2: Knotting Your Necklace
Now comes the fun part—knotting your crystal necklace:
You’ll start by anchoring your crystal. Decide where you want your first crystal to sit and tie a knot a few inches above that point. This will secure the crystal in place and create a space between the clasp and the crystal.
Adding spacer beads is the next step in this process, but it’s entirely optional. To create a balanced design, consider adding a few spacer beads before attaching your crystal. These beads can also prevent the knots from sliding too close to the crystal.
To secure each crystal in place, use a simple knotting technique. Place a crystal on the cord, tie a knot close to the crystal to hold it in place, and then tie another knot a short distance from the first knot. The space between these knots allows your crystals to be showcased beautifully.
Repeat the knotting process for each crystal you want to add to your necklace. After attaching each crystal, you can gently tug on the knots to ensure they’re secure and evenly spaced.
Section 3: Finishing Touches
As you approach the desired length for your necklace, it’s time to finish up:
Add Spacer Beads (Optional): Similar to the beginning, you can add spacer beads before attaching the final crystal to create a balanced look.
Tie the Clasp: Once you’re satisfied with the length and arrangement, tie the other end of the clasp to the cord using a secure knot. Trim any excess cord or thread.
Section 4: Showcasing Your Creation
Congratulations! You’ve successfully crafted a stunning wire-free crystal necklace using the knotting technique. This method not only highlights the beauty of your crystals but also adds an artisanal touch to your jewelry collection. Wear your necklace with pride, knowing that you’ve created a piece that’s uniquely yours.
So, whether you’re a beginner or a seasoned jewelry maker, experimenting with the knotting technique can open up a world of creative possibilities. Enjoy the process, let your imagination run wild, and wear your crystal necklace with confidence!
Go With a Crystal Necklace Kit for Convenience

Crystal necklace kits are a brilliant choice for both beginners and seasoned crafters seeking a convenient and enjoyable jewelry-making experience. These kits provide all the essential materials in one package, making it easy to create stunning crystal necklaces without the hassle of sourcing components.
Perfect for solo or group activities, they usually offer step-by-step instructions or tutorials, empowering you to experiment with designs, colors, and techniques while learning valuable skills.
While you can get a kit that includes the crystals, in our personal opinion and experience, investing in a kit that focuses on the materials and tools is a better option. This is especially true if you plan to make multiple pieces. The PAXCOO Jewelry Making Supplies Kit is a good example of a kit that is worth investing in for continued use.
Alternatively, a kit like the Selizo Ring Making Kit with Crystal Beads and the PAXCOO Crystal Jewelry Making Kit for Adults are good options that include fewer tools but are packed with more supplies and small crystal chips. (Although, we can’t confirm the quality of the chips.)
Where to Source Crystals for Crystal Jewelry
We’d also like to point out the importance of crystal sourcing when it comes to crystal jewelry. If you’re simply making something for fun then you can easily go with a craft kit quality crystal. However, if you do care about the properties of the crystal and its authenticity then we recommend you pay closer attention to where you’re purchasing it from.
Some common options when picking crystals for crystal jewelry making are:
- Local gem and mineral shops
- Craft stores
- Online marketplaces or retailers
- Gem shows and exhibitions
- Wholesalers
- Metaphysical shops
- Local art fairs
Remember to research the types of crystals you’re interested in and their properties before purchasing. Each crystal carries its own energy and meaning, so selecting the right ones for your jewelry designs can add an extra layer of significance to your creations. Additionally, read reviews and check the reputation of online sellers to ensure you’re getting high-quality and authentic crystals.
FAQs
Can you grow crystals for jewelry?
Yes, you can grow your own crystals for jewelry, including a crystal necklace. This is a much longer process and requires a little more handy work to ensure the crystal is cut correctly and doesn’t break your supplies. Generally, you can grow Quartz, Rose Quartz, and Amethyst with a little patience.
What is the easiest crystal to grow?
If you’re for more aesthetics rather than energy flow, a simple borax crystal can grow in roughly eight hours. Though these aren’t suitable for crystal jewelry. In these cases, we’d recommend using something like this Mega Crystal Growing Kit from National Geographic for Amethyst and Quartz crystals specifically.